Batch Setup - Scan Setting
On selecting a Batch Setup, right-click to open the context menu and select Batch Setup Properties.
The Batch Setup Properties window appears.
On the Batch Setup Properties window, select the Scan Setting section, and configure the settings as described below:
General Scan Permissions:
– These checkboxes control what actions are allowed while scanning:
While Scan, view scan image as:
Quick Image View or All Scan View
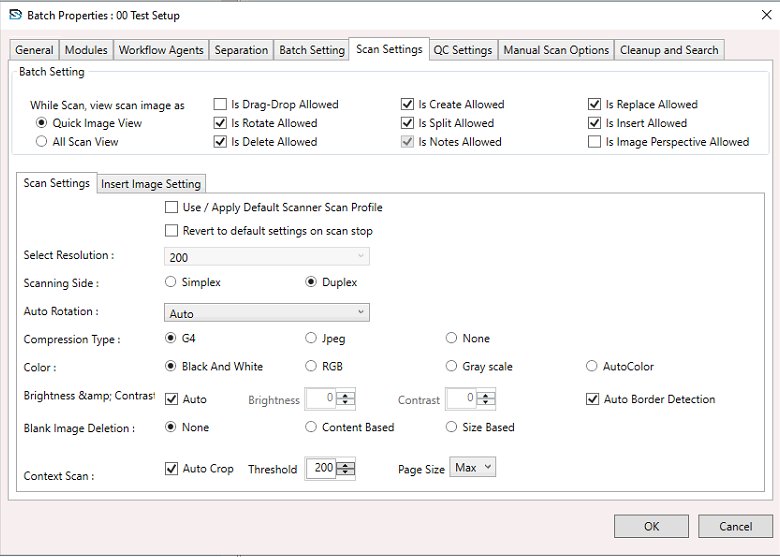
Is Drag-Drop Allowed
- Allow drag and drop of scanned images.
Is Create Allowed
– Allow new documents to be created.
Is Replace Allowed
– Allow replacement of scanned images.
Is Rotate Allowed
– Allow image rotation.
Is Split Allowed
– Allow splitting of documents.
Is Insert Allowed
– Allow inserting pages.
Is Delete Allowed
– Allow image deletion.
Is Notes Allowed
– Allow adding notes.
Is Image Perspective Allowed
– Allow image perspective correction (currently unchecked).
Scan Settings Section:
Use / Apply Default Scanner Scan Profile
Revert to default settings on scan stop
Image and Scanner Configuration:
Select Resolution (e.g., 200 dpi)
Scanning Side – Simplex or Duplex (Select any one option)
Auto Rotation – Auto-adjust orientation
Availble option:
(None, Auto , Rotate 90 , Rotate 180 , Rotate 270 , Auto Default 90 , Auto Default 180 , Auto Defualt 270)
Compression Type – G4 (default), Jpeg, or None
(Select any one option)
Color Mode – Black & White, RGB, Grayscale, or AutoColor
Brightness & Contrast – Auto or manual
Auto Border Detection
Blank Image Deletion – None, Content Based, or Size Based
Context Scan Options:
Auto Crop
Threshold (default 200)
Page Size – e.g., Max
How It Works:
- Scanner follows pre-configured rules during scan.
- Images scanned with defined resolution, color, and orientation settings.
- Blank pages are deleted based on the setting.
- Auto crop and border detection refine image quality.
- Allowed actions (rotate, delete, etc.) can be done instantly.
- Settings reset if 'revert to default' is enabled.